This article introduces phpMyAdmin and gives a brief overview of how it works.
phpMyAdmin is free, open source, and was created using the PHP programming language. It was created as a wrapper around the MySql database. PhpMyAdmin is a web interface that gives the user the ability to manage their databases from any device that runs a modern web browser.
What is phpMyAdmin
phpMyAdmin is a free software tool that is used to administer the MySql data engine. It was created in PHP. It was first released in September 1998. Being very mature, it is well documented and widely used.
Some of the things you can do with phpMySql are create and test SQL queries, manage databases, and manage users.
phpMyAdmin is very feature-rich. It is used as a web interface for the MySql data engine and its derivatives.
I use it often when I need to create a complicated SQL query. SQL stands for Structured Query Language, which is how programmers interface with databases.
In the next section, we will dig a little deeper.
How Does it Work
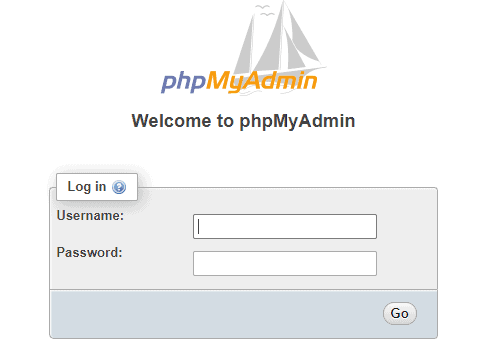
Login – To get started one must log in with a MySql username and password. This will give the user access to any databases they have permission to use.
The phpMyAdmin Home Page – Once logged in you will see the phpMyAdmin Home Page that will look like the following.

In the upper left area is where you can find the main menu.

Main Menu Functionality
- To return to the home page click the “phpMyAdmin” text.
- The “home” icon returns to the home page as well.
- The next icon which looks like a door with a green arrow, is the logout button.
- The round icon that contains a question mark links to the local phpMyAdmin documentation.
- The icon that looks like a page with a smaller page over it is linked to the MySql reference manual.
- The gear is liked to the settings pages.
- The green icon causes the page to refresh when clicked.
Top Menu Functionality
The top menu will be referred to as tabs in this article.

- Databases – Linked to the databases page.
- SQL – Linked to one of the two query building pages. This is the less feature-rich version of the two SQL pages.
- Status – Linked to a stats page.
- User account – Links to the user account overview page.
- Export – Linked to the export database page.
- Import – Linked to the import page.
- Settings – Linked to a page that provides for import and export configuration.
- Replication – Linked to the replication configuration page.
- Variables – Linked to the server variables and settings page.
- Charsets – Linked to the character settings and collation page.
- Engines – Links to the storage engine page.
- Plugins – Links to the plugins page.
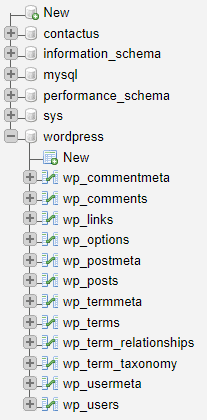
Home Page List of Databases and Tables
On the left side of the home page, you will see a list of databases. By clicking on a database, it will expand to display the tables within that database.
Manage Users
- Create a User:
- Click the “home” icon, click the “User accounts” tab, then click “Add user account” which is about in the middle of the form.
- Complete the form.
- Modify a user account:
- Click the “home” icon, click the “User Accounts” tab, then click the “Edit privileges” link that is on the same line as the user account you want to modify.
- On this page you can:
- Edit the user’s privileges.
- Add privileges to other databases.
- Grant or revoke global privileges.
- Change the user’s password.
- Change the login information (username, hostname, password).
- Remove a user:
- Click the “home” icon.
- Click the “User Accounts” tab.
- Click the checkbox next to the user you want to remove.
- Then select “Drop the databases that have the same names as the users” if you want to remove the database with the same name as the user.
- Click the “Go” button.
About User Privileges
User privileges are what access the user is given. Such as what databases they can see and modify and from where, such as being restricted to the local server.
Manage Databases
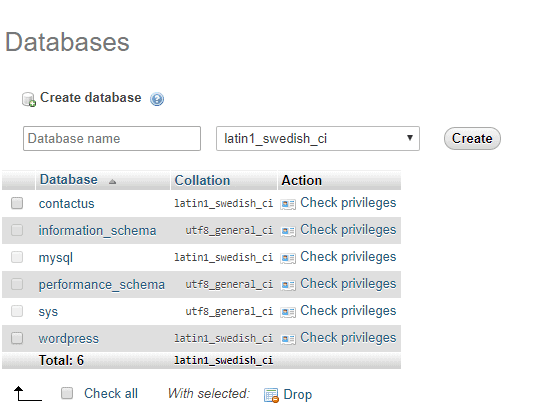
- Create a database.
- Click the “home” icon, click the “Databases” tab.
- Enter the Database Name, select the collation, and click the “Create Button” button.
- A form will be displayed that allows you to enter the table’s name and the number of fields the table will contain. Complete the form and click on the “Go” button.
- Complete the form and click the “Save” button.
- Modify Databases.
- From the left column of the home page select the database you would like to modify by clicking on the database name.
- The center panel will show all the tables in the database. From this form, you can branch-off to perform other actions to include creating a new table.
- Delete or drop a database.
- From the left column select the database you would like to drop by clicking on the database name.
- Then click the “Operations” tab.
- Under “Remove database” click “Drop the database (DROP)”
Manage Tables
- Click the home icon, then click the “Databases” tab. You will see a form like the one above.
- Click the Database you wish to manage. This will take you to the “Structures” tab. You will be on a form like the one below. This is where you manage your tables.
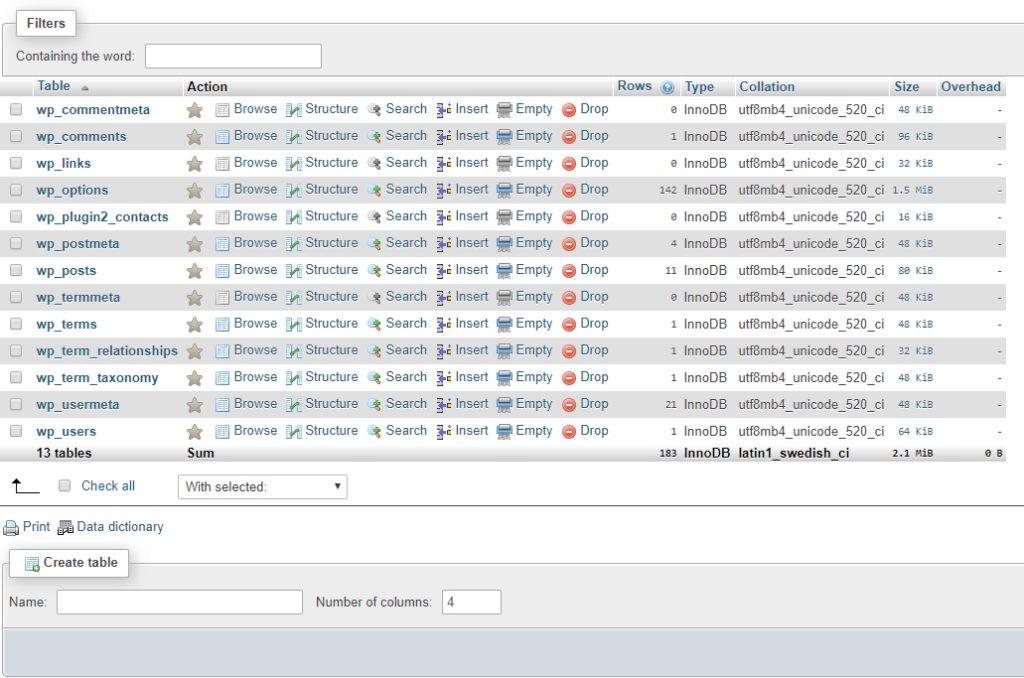
You can now:
- Browse – This allows you to “Edit”, “Copy” or, “Delete” each record. You will see the columns along with their data. You can also export data from this screen.
- Structure – From this screen, you can modify the structure of each field – Change, “Drop”, or you can perform other operations.
- Search – This allows you to search your data.
- Insert – This is a form that allows you to add a record to the selected table.
- Empty – This feature will remove all the records in the table. Be careful with this option.
- Drop – Allows for the entire table to be removed/destroyed. Be careful with this option.
Note you can also use the list of tables in the left panel to drill down from your database to a table, and the table’s fields.
About Collation
Collation defines how to sort or how to weigh items in relevance to other items. For more information read the MySql documentation on supported character sets and collations [https://dev.mysql.com/doc/refman/8.0/en/charset-charsets.html] Notice MySql recommends you test your selected collation to ensure you are getting the results you desire.
Import Data
- From the top menu click on “Import”.
- A form will appear. Click “Choose File”, which will open dialog page for selecting the file you want to import. To the right of “Choose File”, you will see the max file size that you can import. The value can be adjusted. Modifying this value is outside the scope of this article.
- Select the “Character Set”.
- Set or unset Partial Imports.
- Set or unset Enable foreign key check.
- Set the file format.
- Set the SQL compatibility mode or leave it at its default of none.
- Set or unset “Do not use AUTO_INCREMENT for zero values”.
- Click the “Go” button.
Export Data
- From the top menu click on “Export”.
- Select the “Export method”:
- Quick – display only the minimal options.
- Custom – display all possible options.
- Select the “Format” from the drop-down.
- Click the “Go” button.
SQL Queries
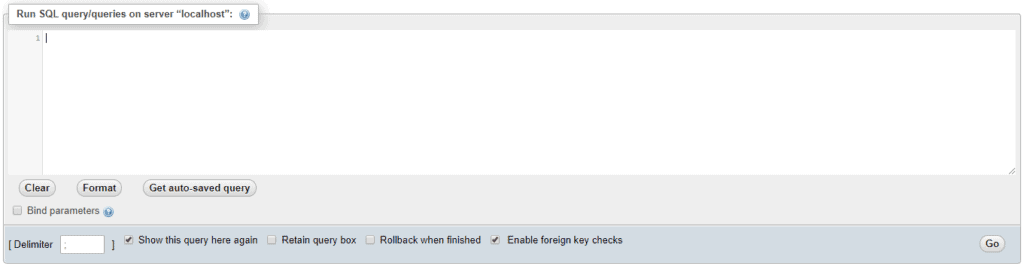
SQL stands for Structured Query Language. This is another area you will want to become familiar with. SQL is your bread and butter when it comes to working with databases. I use the SQL box to build complex SQL statements.
There are two ways to get to the query interface.
- Click the “home” icon, then click the “SQL” tab to get to the plain SQL interface:
- From almost any page you can click the table under a database on the left column and then click the “SQL” tab. That will bring up an SQL interface that has a lot of features you will probably find useful. From here you can click any of the buttons that are directly below the query box. The cool part of this is it will create the type of query you want to create based on the table you selected. This is a great way from a beginner to learn SQL.
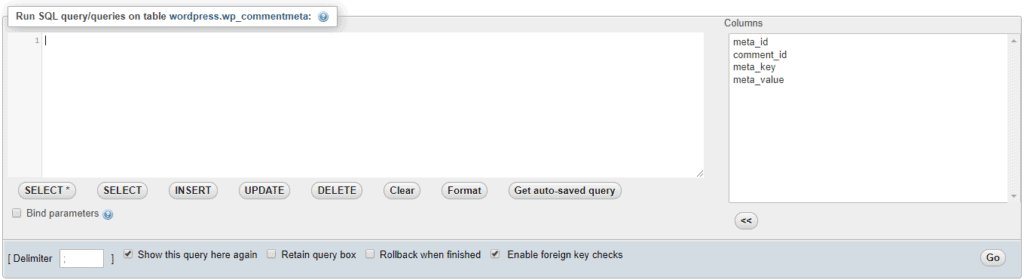
The buttons I want to point out are:
- <Select *> – Will create a wild card select (a select pulls data).
- <Select> – Will create a select listing all the fields in the table.
- <Insert> – Will create an insert query. This query contains all the fields of the table (an insert creates a new record and populates it).
- <Update> – Will create an update query. This query contains all the fields of the selected table and place holders for the data that is to be updated (an update query is used to update data).
- <Delete> – Will create delete query ( a delete removes a record).
- <Clear> – Will clear the text box.
- <Format> – This will format the query so it can be used within a program.
phpMyAdmin Documentation
There is a lot to know. This article does not cover everything. This link will take you to the phpMyAdmin documentation where you can learn more.
Conclusion
There are a number of tools you can use to manage your MySql data, each has different features you might find useful.
The nice thing about phpMyAdmin is it is a web application, meaning it runs in a browser. That means you can access phpMyAdmin from any device that runs a modern browser.
phpMyAdmin is very feature-rich and is a great tool for programmers and system administrators.